All Snug As A Bug
When the kids are ALL SNUG AS A BUG in bed, I find some time to create...
Monday, November 11, 2013
Fall Wreath
So, I still exist. The last few months have been full of change including a move across country. But I am starting to craft again. Here is a wreath I made last week which cheers up my front door right now.
Thursday, April 25, 2013
I Spy Quilt
I have babysat in my home for the last 2 1/2 years. I can't believe it but it is time to move on, and in a couple of short months we will be moving far away. The children that I watch have really been like my own children. I will miss them... So, I couldn't stand the thought of them forgetting all about "Miss. Kristen", so I made them each a quilt. They are all "I spy quilts" I used a lot of random fabric and then embroidered a patch with things to look for on the quilt. For the quilt's backing fabric I used minky fabric so it will be nice to snuggle with.
Monday, March 25, 2013
Wednesday, March 20, 2013
Easter Wreath
I wanted to make a wreath that would be nice for Easter but that I could keep up a little longer if I wanted to. I think this fits the bill.
Wednesday, March 13, 2013
Shamrock Necklace
St. Patty's is right around the corner! We decided to get our craft on and made these necklaces. I've seen similar ones with straw pieces as dividers but we switched it up with noodles that we dyed green.
To dye your noodles dump them into a plastic bag and pour in 2Tbs of rubbing alcohol and a bunch of drops of food coloring. Close up the bag and squish it around to distribute the color. Then leave the bag on the counter for a couple of hours or even overnight, taking time to squish around the color every once in awhile. Then dump noodles onto two layers of paper towels, move noodles around to make sure they are not touching. Let dry.
When your noodles are good and dry then they are ready to use. We cut out a bunch of shamrocks and put them in between the noodles. It gives it a lei look. And ta da, you are done! My five year old loved dying the noodles and making a pattern when we strung on the noodles and shamrocks.
Monday, February 4, 2013
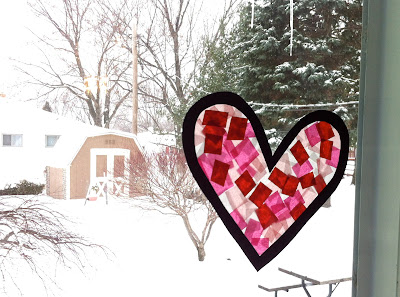
Stained Glass Heart Tutorial
To make your heart you will need:
-scissors
-crepe paper or tissue paper
-black card stock or construction paper
-clear contact type paper
Fold your paper in half and cut out half a heart shape. While still folded take your folded heart and cut about 1/2 inch all the way around the edge this is the part that you will be using.
Open your heart. Cut a piece of your contact paper big enough to fit your heart on. Pull back the white paper backing on the contact paper, but not all the way. Place your black outline of a heart onto the clear plastic and then put the paper back down on top of the heart and plastic. Rub just enough to make sure the paper is sticking to the plastic.
With the paper still on the back cut around the black out line of the heart as close as you can.
Now you have your hearts ready. Cut your crepe paper into little squares or whatever shape you desire. (I used crepe paper because I already had it on hand. I've done this same craft with tissue paper and it has turned out great.)
Take the white paper backing off and go to town putting on the crepe paper on the sticky part of the contact paper.
Put on as much as you'd like. Make sure to rub the pieces a little to make sure they stick well.
Now you have a beautiful stained glass heart. You can really do any shape for holidays or for fun. Here are some that I've done before. A Butterfly and a Pumpkin.
Tuesday, January 22, 2013
Snowmen
Today we had some craft time at home. I babysit and have been saving empty baby food puff containers. They were screaming "make me into a snowman" so we complied. We glued buttons on for the eyes, mouth and buttons. For the nose I poked a whole in the container and we pushed in an orange pipe cleaner in it. I trimmed the pipe cleaner on the end to give it more of a carrot shape. The hat is made from an old foamies sheet I had. We added a little ribbon for a scarf and ta da, a snowman!
Subscribe to:
Posts (Atom)


